Recently, more and more Drum Ambition subscribers have been reaching out for recommendations on how to record their acoustic drums. Their goal might be to record drum practice sessions or a band rehearsal, do a drum cover of a popular song, or have a simple way to upload video to social media platforms that features good quality sound.
The problem is, drums are a hard instrument to record. From the deep lows of the bass drum and lower toms to the piercing high tones of cymbals, and the cutting pop of a snare drum - there are a diverse spectrum of sounds that quite simply get lost in translation on our trusty smart phones. Furthermore, unless you want to invest in expensive microphones and music production software (and take the time to learn how to use all of this), the options for a good drum recording can be quite limiting. For those who just want to record their playing to post a video on YouTube or have a recording of their latest practice, this can be somewhat frustrating.
Enter the Yamaha EAD10 - quite possibly one of the easiest ways to record drums for hobbyists that need a quick, clear, no thrills mix. But that's just one out of multiple compelling features. We got hold of one, and enlisted Drum Ambition Contributor Jorge Velázquez to review it. We're good friends with the folk at Yamaha, but we always promise a thorough, impartial review to our readers and subscribers.
If you can't make it to your friendly local drum retailer, you can buy your EAD10 here. As an affiliate of Amazon.com, we may receive a commission if you choose to do this.

Review.
When I first received the module for testing, I wasn’t sure what it could do. Turns out, it can do a lot. Whether you wish to record yourself or your band during practice, enhance a live performance, or publish play-along videos, the Yamaha EAD10 can make it a lot easier for you.
Setup and configuration.
The setup for this review was a standard out-of-the-box configuration, with the only addition being a DT50S drum trigger, which may or may not be necessary depending on what you want to accomplish. Setup was very easy. The main recording module is very light and compact, small enough to be able to toss into your gig bag. The trigger/microphone that comes with it mounts onto the kick drum hoop with a single clamp screw. I was literally up and running within a couple of minutes. I appreciated the fact that both the cable that connects the kick drum trigger and the power cable for the main unit are both over 8 feet long, so you should be able to reach a power outlet and still have some flexibility in where you place the main module, even if you’re on stage.
Main Features.
I powered up the unit and tried out the settings, which were mostly intuitive so I was able to navigate through the various features fairly easily. Having set up the metronome, I immediately recorded some audio samples, playing a few different types of beats. The single stereo microphone is contained within the kick drum trigger unit, and mounted on the drum hoop, as seen below.
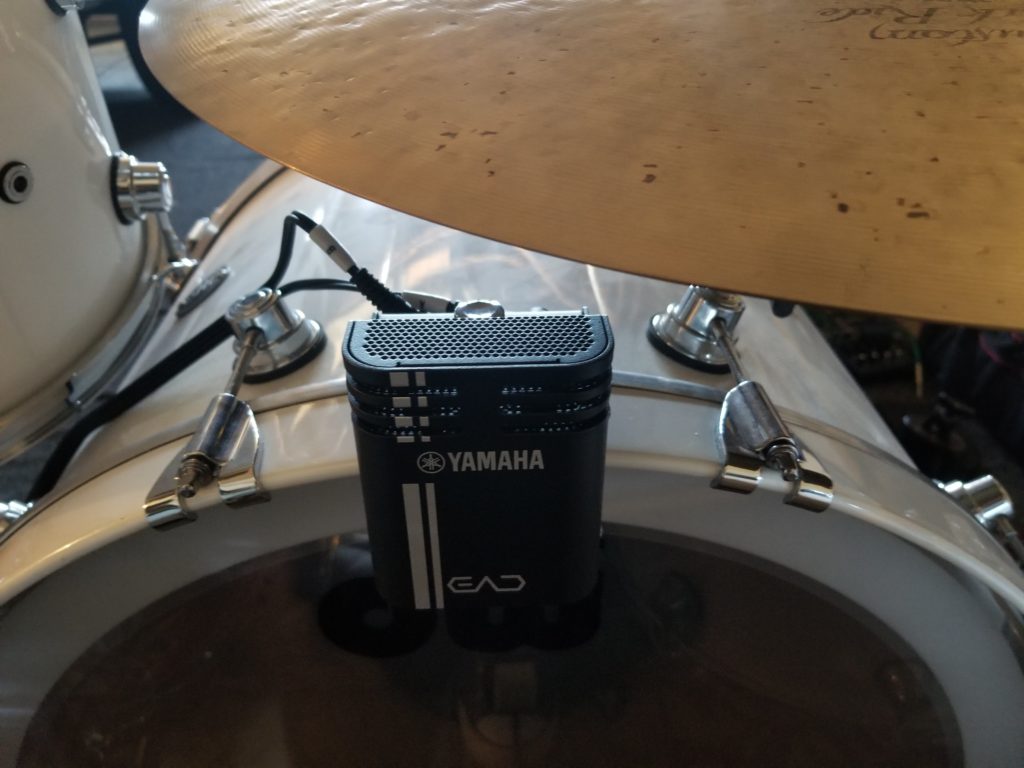
Turns out the recording sounded good, with most of the pieces of my drum kit (4-piece configuration) coming through very well. The only issue I had was that, since my ride cymbal is mounted directly above my kick drum, the bell of the ride came through particularly strong. This was mostly solved by using the Compressor preset (in the Effects settings - more on that later). I could have also moved the recording unit further away from the ride cymbal.
I should mention that the unit records in 16-bit, 44.1 kHz WAV files, so the audio is CD quality and should readily import into most modern audio recording software. One thing to note however, is that although the unit comes with on-board memory, it is only sufficient to capture about 90 seconds of audio. It’s fine for just setting up and experimenting with, but you’ll definitely need external memory. The rear of the unit contains a USB connector you can use to attach a flash drive or other storage. I connected an external flash drive and was up and running after having to re-format the drive using the EAD10 system menus. Easy enough.
The main module (below) has two volume knobs, one to control the Master volume, and an Audio/Click volume, which is used to control playback and metronome volume. Here’s where it gets interesting. Below the volume knobs are 3 knobs that are used to control sound effects and triggering: Reverb, Effect and Trigger. The first, Reverb, allows you to set the amount of reverb to apply to the incoming signal from the microphone. A separate menu item allows you to choose from several reverb presets, including common types such as Hall, Stage, Plate and several others. Next, the Effect knob controls the level of the effect which, as with Reverb, can be selected from various presets available through the display menu.

Types of effects provided include Compressor, Flanger, and Delay. Finally, the Trigger knob sets the volume for the chosen trigger effect. All three of these settings can be manipulated together to create a Scene. The EAD10 comes with 50 preset scenes and room for up to 200 user-defined scenes. This is where the real power of the unit comes into play, allowing you to customize your drum sound for your own personal recordings or for live performances. The unit comes with hundreds of instruments that can be triggered, from standard percussion items to electronic drums and many more. You can also trigger your own sounds. As mentioned at the beginning of this article, the configuration I tested included an additional DT50 drum trigger, which can easily be mounted on a snare (or tom) and trigger a completely different sound. You can adjust the trigger sensitivity through the display menu, and connect up to six pads or drum triggers on the rear panel.
The dual ¼” outputs, also at the rear of the unit, can be used to connect to a mixer or other PA for live performances. You can cycle between all of your saved scenes using the Scene knob. The unit comes with a module holder so you can mount it on a hi-hat or cymbal stand using a cymbal stand attachment (sold separately). Having the main unit close by means you can change scenes literally on-the-fly, further enhancing your live performances.
Recording and publishing video.
Probably the killer feature for this product is the ability to record and share videos. This is accomplished through Yamaha’s Rec’n’Share app, currently only available for iOS. You’ll need a Lightning-to-USB connector in order to get the audio from the EAD10 to the Rec’n’Share app. Unfortunately, this cable is not provided so you’ll have to locate one. The connector on the rear of the EAD10 is USB type B, which can make it a little hard to find a suitable cable. Once you get over that hurdle, however, you’ll find the app is easy to use. You can choose from audio files in your iTunes library or phone storage and import them into the app to use as play-along or backing tracks. I picked one of my favorite songs, Highway To Hell from AC/DC, to play along with. Once the audio was loaded into the app I was able to start recording right away. The app will determine the tempo and set the BPM for you when the file is imported, so you’ll be able to play along to the metronome built into the app, if you like. You can set the number of clicks on the count-in to help you prepare for the start of the audio. Once you’ve finished recording you can save the video to your phone or share it using whatever apps you may have installed on your phone, such as YouTube, Dropbox, etc.
This is a great feature for anyone who wishes to create instructional videos or do drum covers. The app is so easy to use you can literally be publishing your videos in just minutes. A couple of times I got an “unspecified error”, which prevented me from saving the recorded video, but it didn’t happen too often and presumably this will be fixed in future versions of the app.
Pricing.
As you can see, the EAD10 is a very flexible module that you could incorporate into your regular practice sessions or bring on the road to enhance your live performances with added effects and triggers. It is easy to set up, and is reasonably priced. (The suggested retail price is $629, but sells generally for around $499 in most online stores, excluding the additional DT50 trigger). Overall, the ability to create and store scenes with custom triggers and effects, as well as the ability to create and publish videos are great features that make this a very compelling product.
If you can't make it to your friendly local drum retailer, you can buy your EAD10 here. As an affiliate of Amazon.com, we may receive a commission if you choose to do this.
If you have any questions relating to this review, please email [email protected].
Reviewed for Drum Ambition by Jorge Velázquez.